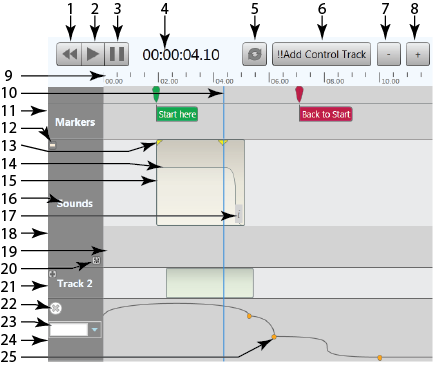
The Timeline allows you to stage audio files to play at specific times in relation to one another. You can place the files on separate tracks; each track going to a different output, or you can place the files end-to-end on the same track. You choose the audio files from those stored on the Core in the Messages, Preambles, and Audio file sub directories.
|
Control |
Function |
Default/Range |
|
|---|---|---|---|
|
1 |
Rewind button |
Moves the time cursor back to the beginning of time – 00:00:00.0 (hh:mm:ss.frames) and stops. |
N/A |
|
2 |
Play button |
Starts or restarts the time cursor moving forward. As it passes over an audio file, that file begins to play. |
Default = Off Range = Off/On |
|
3 |
Pause button |
Stops the time cursor at the point on timeline where Pause button is pressed. |
Default = Off Range = Off/On |
|
4 |
Digital Readout |
Indicates the position of the time cursor in hh:mm:ss.frames |
N/A |
|
5 |
External Sync Enable button |
|
|
|
6 |
!!Add Control Track |
Adds a control track below the Tracks. |
|
|
7 |
– and + buttons |
Zooms the tracks in and out . |
|
|
8 |
Timeline |
Horizontal marks indicating the position of the time cursor, and the position and length of the audio files placed in the tracks. Double click the timeline, or click Pause to pause the playback, and control the time cursor with your mouse – your mouse pointer must be on the timeline itself. |
|
|
9 |
Markers |
Double-click the Marker row to place a Marker. After the Marker is in the row, you can move it (click and drag) as needed. The Markers allow you to Jump to another Marker, Pause, or load a Snapshot. Hover over the Marker to display the Name and time position of the Marker. |
|
| * |
Marker Name |
User-defined name for the Marker |
Default = Marker # |
| * |
Marker Color |
User-selected color for the Marker |
|
| * |
Marker Function |
Defines what is going to happen when the time cursor reaches the Marker. Choices are None, Jump, Pause, Load Snapshot. |
Default = None |
| * |
Marker Jump To |
When the Marker Function is set to Jump. This is a drop-down list showing all Markers currently defined. When the time cursor reaches this marker, it moves to the Marker selected here. |
|
| * |
Marker Bank |
When the Marker Function is set to Load Snapshot. This is a drop-down list showing all Snapshot Banks currently defined in the design. When the time cursor reaches this Marker, the Snapshot is initiated. |
|
| * |
Marker Index |
When the Marker Function is set to Load Snapshot.
|
|
| * |
Marker Ramp Time |
When the Marker Function is set to Load Snapshot.
|
|
|
Track Name |
Click the Track Name (default Track #) to enter a new name. | ||
|
12 |
– Track minimize / |
Click the – to minimize the vertical size of the track, or the + to maximize the vertical size of the Track. |
|
|
13 |
v Show / hide Volume track |
Click the "v" located in the lower right of the Track title box to show or hide the Volume Track for a Track. |
|
|
20 |
Volume control line |
Double click in the Volume Track to display the Volume Line with a single "handle". Double click on the Volume Line to add another Handle. The Handles allow you to change the volume of the audio at the spot of the Handle. You can position the Handle horizontally (time) or vertically (volume). |
|
|
21 |
|
|
|
|
22 |
|
|
|
|
23 |
|
|
|
|
24 |
|
|
|
|
25 |
|
|
|
|
26 |
|
|
|
| * These properties ar part of the Marker dialogs and not shown in the example. | |||
|
Property |
Function |
Choices |
|---|---|---|
|
|
|
|
|
|
|
|
|
|
|
|
|
|
|
|
|
|
|
|
|
|
|
|
|
|
|
|
|
|
|
|
|
|
|
|
|
|
|
|
|
|
|
|
|
|
|
|
|
|
|
|
|
|
|
|
|
|
|
|
|
|
|
|
|
|
|
|
|
|
|
|
|
|
|
|
|
|
|
|
© 2009 - 2016 QSC, LLC. All rights reserved. QSC and the QSC logo are trademarks of QSC, LLC in the U.S. Patent and Trademark office and other countries. All other trademarks are the property of their respective owners.
http://patents.qsc.com.
![]()